
As a keiki, one of my favorite childhood memories was building a fairy garden with my ‘ohana. My parents decorated a tree stump with teeny-tiny windows and itty-bitty steps winding around the wood, climbing slightly higher as they went, leading to a fairy-sized door. It was magical. The perfect hale for mythical creatures to come and dwell. This project, along with a handmade giant bubbling volcano (that actually erupted) are things we did together that now, even in my 30s, I look back on with such joy. The quality time, the creativity. Things I strive to cultivate with my own keiki.
Crafting a summer fairy garden is a project I did with both my six-year-old and four-year-old. Encourage your keiki to walk around your house or street together, gathering items. This is a time to play and notice the various textures, colors, and shapes of rocks, sticks, flowers, and plants they might find. How about asking neighbors if they have any of these items to share? Let these ideas inspire you, there’s not one “right” way to create and you can do this in one day or more.
Materials:
- Medium to large size vessel for your fairy garden
- Dirt and/or sand to fill your vessel
- Rocks, of various sizes and colors
- Twigs
- Flowers, fresh herbs, or plant cuttings
- Seashells
- Popsicle sticks
- Scissors
- Paint/paintbrushes
- Wood Glue
Optional:
- Bird Feeder or Wooden House
- Smooth glass pebbles
- Moss
- Colored beads or costume gems
- Small terracotta pots
- Ribbons or string
- Hot glue gun (an adult should help younger keiki)
- Mod podge for sealing any painted/glued surfaces
Instructions:
- Pick a place in your garden or yard for your fairy garden.
- Set out your vessel (can be a wood/ceramic planter pot or box or wicker basket, ideally with small drainage holes) and fill it with dirt or sand. *If space allows, you can always forgo a vessel.
- Visualize the space and how you would like to set up your fairy garden. Keiki can practice drawing sketches of where they want things to go and what they hope it will look like.
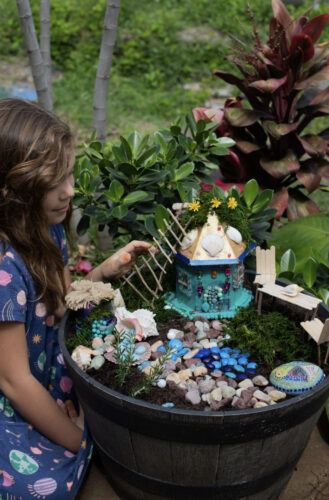
- Once you have a rough plan, set out paints and craft items and allow keiki to make the fairy home out of twigs, popsicle sticks, or a bird feeder. Gems, pebbles, sticks, or moss can all be glued onto the fairy home. Let your keiki’s imagination be their guide.
- Create fairy “furniture” such as tables and chairs, ladders or bridges, etc. to help tell the story of this space.
- Anchor the fairy home and furniture throughout your space, by pressing it into the dirt or sand. You can weave rocks in a pathway or make a stream out of blue-colored glass, as an idea. Likewise, little sprigs of fresh rosemary look like miniature trees.
Maile Crewdson is a local mom of three young keiki with life-threatening food allergies. Born and raised in upcountry Maui, Maile embraces motherhood wholeheartedly, in its beauty and challenges. Find her online at @littlemauifamily and @cyrusbakingco.


